

Introduction
Scripts are pre-written messages that you can quickly send to fans with a single click. They help maintain a consistent communication style across your team and save significant time when responding to common questions or sending promotional content. Each script can include:- Text — the message body with support for personalization tags
- Media — photos, videos, GIFs, and audio from the creator’s gallery
- Price — optional PPV (pay-per-view) pricing for premium content
- Notes — internal comments visible only to your team
Creator summary
The Scripts page first shows every creator available to you with separate Scripts and Scenarios counts. Select a creator row to open that library. Use All creators to return to the summary. The selected creator is part of the page address, so browser Back and Forward return to the expected summary or library view.Scripts library
Access the scripts library through the sidebar menu by clicking Scripts, or directly from any chat using the Manage button in the scripts panel. The library displays all scripts in a table with the following columns: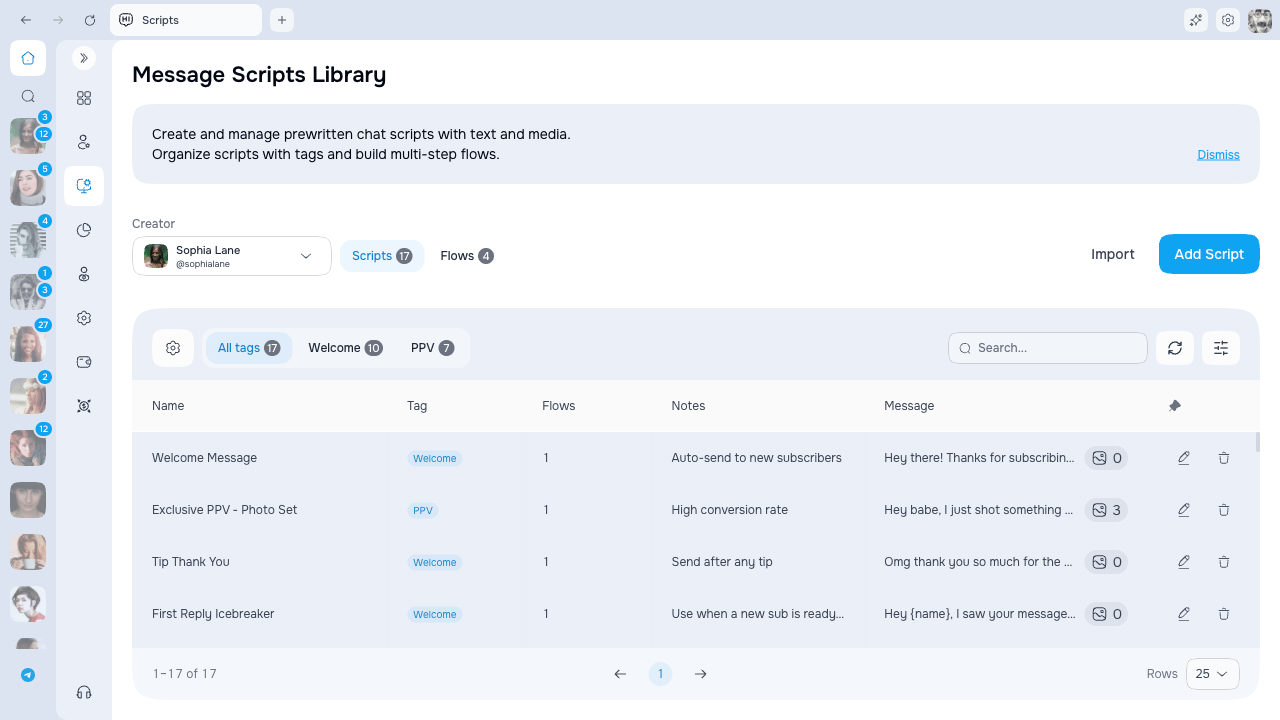
Use the search bar to find scripts by name or text content. Filter by creator to see only scripts associated with a specific account.
Add Script, Edit, and Delete actions appear only for creators inside your access scope. If you do not see these buttons on a row, the script belongs to a creator you are not allowed to manage.
Organizing with tags
Tags help you categorize scripts by topic, purpose, or campaign. A tag bar appears above the scripts table when a creator is selected.Tag bar
- Click a tag to filter the scripts list
- All tags shows the unfiltered list with a total count
- Each tag shows a badge with the number of assigned scripts
- Click + to create a new tag inline
- Click the gear icon to open the Manage Tags modal
Managing tags
In the Manage Tags modal you can:- Create — type a name and confirm
- Rename — click the pencil icon, edit inline, press Enter
- Reorder — drag tags by the grip handle
- Delete — click the trash icon (scripts become uncategorized)
Assigning a tag to a script
When creating or editing a script, use the Tag dropdown to assign it to a tag. Tagging your scripts makes them easier to find, both in the library and when using scripts in chat.Creating a script
Click Add Script to open the creation modal. Fill in the following fields: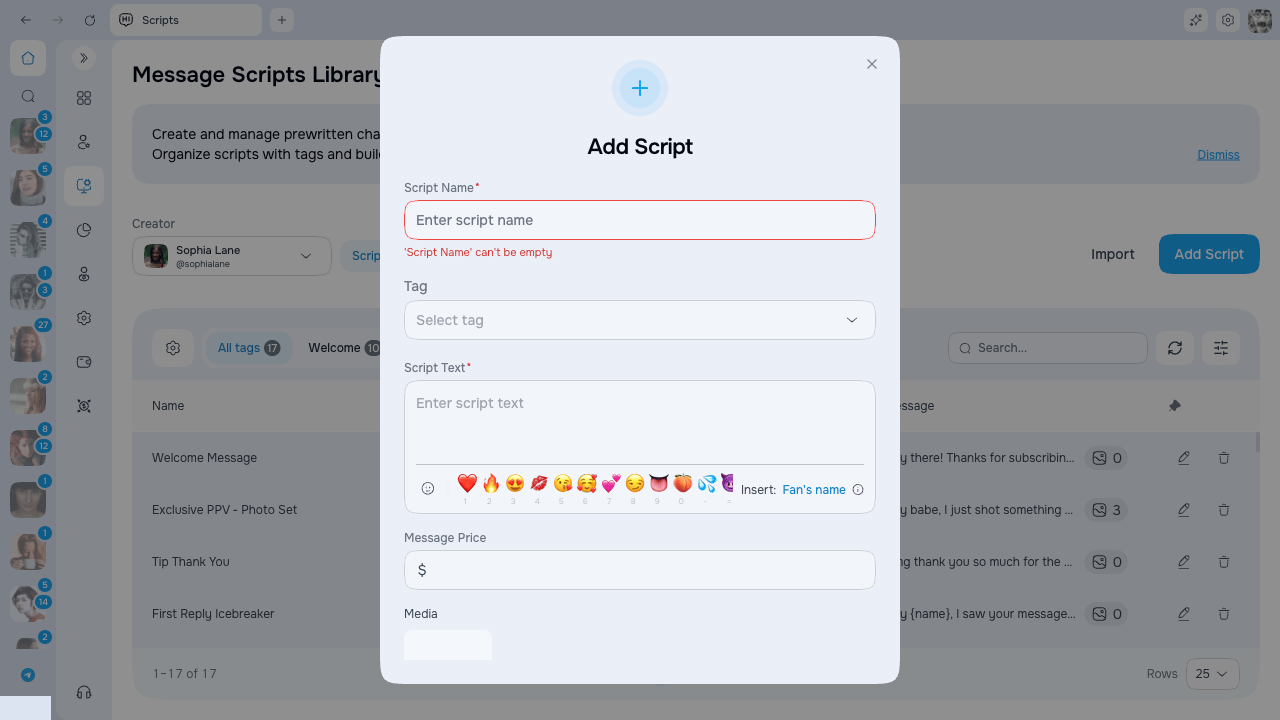
The {name} tag
Personalize your scripts by inserting the{name} tag anywhere in your text. When the script is sent, this tag is automatically replaced with the fan’s display name.
Example:
- Script text:
Hi, {name}! Thanks for subscribing! - Sent message:
Hi, John! Thanks for subscribing!
Attaching media
To add media to your script:- Click the Add file button in the script form
- Browse the creator’s gallery (Vault) to select files
- Click on files to attach them — multiple selections are supported
- Attached files appear as thumbnails in the script form
Paid scripts and media
The Paid checkbox on media follows the script’s price:
Paid prices can use up to two decimal places. Values from 2.99, values above $200, and values with more than two decimals cannot be saved.
When you set a price, all attached media items start as Paid automatically, and newly attached items also start as Paid. Clear Paid on the specific items that should remain visible as free previews. A paid Script must keep at least one attachment marked Paid because Scripts cannot lock text by itself. Lowering the price back to 0 removes the paywall.
Edit and delete
Manage existing scripts using the action icons in the library table:- Pencil icon — opens the edit modal to modify the script
- Trash icon — permanently deletes the script
Next steps
- Using Scripts in Chat — How to use scripts directly in the fan chat
- Script Flows — How to chain scripts into multi-step conversation sequences