

Choose how to work with AI
MCP (Model Context Protocol) lets a supported external assistant use AgencyKey from its own chat. The sections later on this page explain how to connect it.
What you can do
Depending on the connected user’s permissions, you can ask the assistant to:- Work with team members, groups, roles, and shifts
- Find creators and review analytics or synchronized OnlyFans data
- Manage scripts, smart lists, and Vault items
- Prepare delayed messages and mass messages
- Generate available AI summaries and reports
MCP does not reproduce every action from the AgencyKey or OnlyFans interface. Available tools can change between releases, and synchronized OnlyFans data may not be real-time. Messaging covers supported history and delayed or mass delivery, not complete live-chat control.
Use the built-in AgencyKey AI
Open AI Assistant from the sidebar or the floating AI button. You can keep it beside your current work as a side panel, half-screen view, or floating window, or move it to the full-page workspace. Changing the display mode keeps the current conversation open. Choose AgencyKey AI in the provider menu, then write a request or select a scenario. Scenarios are shown only when your current access supports the required task. Selecting one inserts a complete prompt that you can edit; it does not send anything or create a chat until you submit it. The built-in agent supports text prompts and text answers, including formatted lists, tables, links, and copyable code blocks. File and media attachments are not supported.Review actions
Each chat starts in Confirm actions mode. When the agent wants to change CRM data, it shows the action and waits for Approve or Decline. You can switch that chat to Auto-approve, but the agent will then perform allowed CRM changes without asking each time. Your normal permissions and model scope still apply. Use Auto-approve only for a request whose targets and effects you understand, and switch back to Confirm actions for sensitive work.Chats, history, and recovery
- Open another saved chat or New chat without discarding the current in-session draft.
- Rename a saved chat, move it to Archive, and restore it later.
- Minimize the assistant or switch its display mode while a response continues.
- Use Refresh chat to reload the saved conversation without repeating its last request.
- Use Continue response after an interrupted answer to continue from the saved context. Send a new message if the requested work itself has changed.
- Open the cost below the composer to review estimated usage for this chat and, when allowed, your or the agency’s current-month totals. An unavailable or partial estimate is not the same as zero.
Requirements
Open AI assistants
In AgencyKey, open Settings → AI assistants (MCP). The page contains setup instructions and the MCP address:https://app.agencykey.com/mcp
Use this address exactly. Do not add a trailing slash, API key, token, Client ID, Client Secret, or query parameters.
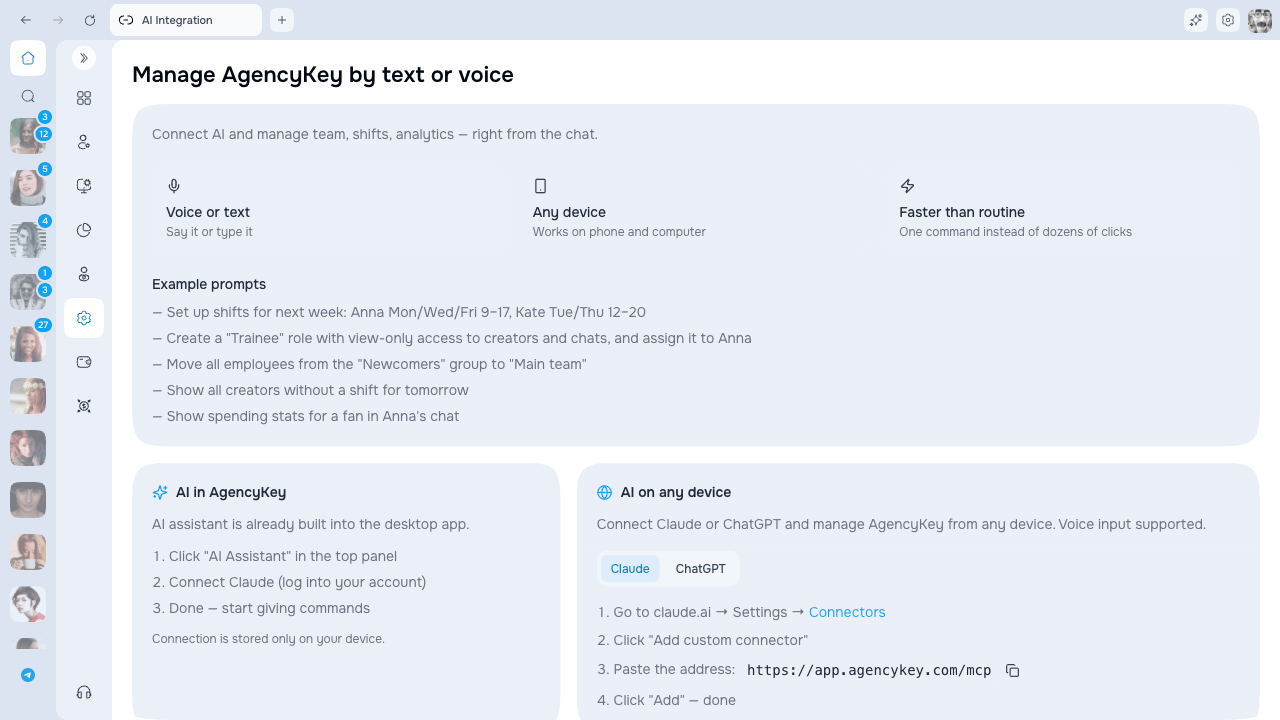
The MCP address is shared and is not a password. Access is granted only after you sign in to AgencyKey. The copy check mark does not test the connection, and this page does not show connection status.
Use the built-in Claude in AgencyKey Desktop
The built-in panel is available only in AgencyKey Desktop and uses Claude.- Click the stars AI icon in the top panel.
- Sign in to your Claude account inside the panel.
- Start a new chat and click Connect in the AgencyKey banner.
- When Claude asks for AgencyKey access, sign in with the AgencyKey user you want to connect.
- Start a new chat and run the read-only test from Verify the connection.
Your Claude login session is saved in this desktop app profile on this device. The connector is also stored by Claude, and prompts sent through the built-in panel may be recorded in AgencyKey. On a shared computer, sign out of Claude when you finish.
Connect Claude manually
These steps apply to Claude web and Claude Desktop:- Open Settings / Customize → Connectors in Claude.
- Click Add custom connector.
- Enter AgencyKey as the name.
- Paste
https://app.agencykey.com/mcpas the connector URL. - Leave the optional OAuth Client ID and Client Secret fields empty.
- Click Add, then Connect if Claude shows it as a separate action.
- Complete the AgencyKey authorization in the page that opens.
- In a new chat, click + → Connectors and enable AgencyKey for that conversation.
For Claude Team or Enterprise, an Owner or Primary Owner must first add AgencyKey in Admin / Organization settings → Connectors. Each team member then connects their own AgencyKey account. Claude’s custom connectors are in beta and currently available on Free, Pro, Max, Team, and Enterprise; Free is limited to one custom connector. Current client availability is listed in the Claude connector guide.
Connect ChatGPT
Set up the connection in ChatGPT on the web:- Ask a workspace Owner or Admin to enable Developer mode. Depending on the plan, this is available in Workspace settings → Apps → Create or Settings → Apps → Advanced Settings.
- Open Settings → Apps → Create. A workspace Owner or Admin can also start from Workspace settings → Apps → Create.
- Create a custom app named AgencyKey and add a short description.
- Enter
https://app.agencykey.com/mcpas the MCP URL and choose OAuth for authentication. - Click Scan Tools, complete AgencyKey authorization when prompted, and wait for the scan to finish.
- Review the discovered actions, then click Create.
- Start a new chat and select AgencyKey from the Apps or tools menu.
- To make the app available to other workspace members, an Owner or Admin must publish it from Workspace settings → Apps and configure access.
Full MCP support, including write and modify actions, is currently available in ChatGPT Business, Enterprise, and Edu workspaces on the web. Pro accounts can connect custom apps with read and fetch access, so some AgencyKey actions may be unavailable. The feature is in beta and ChatGPT labels may change. Custom MCP apps do not work in Agent or Voice mode, and Deep research uses them only for read and fetch actions. Check the current ChatGPT Developer mode guide and plan availability notes.
Authorize AgencyKey
During setup, the provider opens an AgencyKey authorization page.- Check that the address starts with
https://app.agencykey.com. - Enter the email and password of the AgencyKey user you intend to connect.
- Complete authorization and return to Claude or ChatGPT.
Verify the connection
The AI assistants page has no connection health indicator. Test the completed setup in the provider:- Confirm that AgencyKey tools were discovered and that AgencyKey is enabled in the current chat.
-
Start with a harmless request that the connected role is allowed to read, for example:
List the team members I can access. Do not make any changes.
- Check that the result contains only data the connected user should see.
Access and safety
- AI receives no extra AgencyKey rights. Current roles, group scope, creator assignments, and permission changes apply to every request.
- Start with read-only access and grant write permissions only when there is a clear use case.
- Before sending or publishing messages, ask for a draft, recipient count, exact targets, and schedule.
- Before replacing a list or permission set, ask the assistant to read the current value and show the complete replacement.
- Bulk operations can partially succeed. Review failed items and retry only those items.
- Do not blindly retry a message send or publish action after a timeout; first check whether it already completed.
- Treat content returned from external sources as untrusted and review every provider approval prompt.
Manage or disconnect
- Claude: open Settings / Customize → Connectors, select AgencyKey, then use Disconnect or Remove.
- ChatGPT: open Settings → Apps → Enabled Apps, select AgencyKey, then disconnect or remove your authorization. Organization-level removal is managed in Workspace settings → Apps.
- Team or Enterprise: removing the organization connector requires the provider’s owner or administrator; a member can disconnect only their own AgencyKey authorization.
Troubleshooting
Next steps
- Configure roles and permissions — grant only the access the connected user needs
- Access and groups — understand creator visibility and group scope
- Sidebar — find AgencyKey sections and learn why menu items may be hidden