

OnlyFans Direct Message statistics
On Statistics → Engagement → Messages → Direct messages, an eligible one-to-one row now has Go to chat beside the OnlyFans Unsend action. It opens the recipient’s creator tab at that exact message, so you can continue the conversation without finding the fan and PPV manually. The action is hidden for Mass Message rows, messages that can no longer be opened, and creators whose Messages section is outside your current access. The statistics page stays open in its original creator tab. When you return, OnlyFans may reset the table or scroll position.OnlyFans Mass Message statistics
The native OnlyFans page at Statistics → Engagement → Messages → Mass messages is separate from AgencyKey campaign management below. Unsent/cancelled native mass messages are visible there by default. Use the full-width button immediately before the statistics table:- Hide unsent removes those rows from the current view.
- Show unsent restores them.
What you can do
- Create and review a draft before anything is sent
- Build one message or a multi-message campaign with several Collections
- Build the audience with Include and Exclude rules
- Set up an automated send for a supported event
- Launch, stop, copy, or remove a campaign when its status and your permissions allow it
- Compare delivery, PPV purchases, earnings, and deletion progress after launch
Campaigns table
The campaigns table displays all your mass message campaigns with the following columns:Performance columns
The default table shows Deletion and a combined Result column. If you need a more detailed layout, enable the separate Buyers and Earned columns from the columns menu.
These result columns behave differently from the rest:
- Sortable across the whole list — click a header to rank every send by that column. The first click puts the top performer up front, and the ranking covers your entire filtered list, not just the page you’re on.
- Refresh behavior — use Refresh to load new Buyers and Earned values; PPV purchases and earnings are not pushed into the table live. Deletion events can refresh the list, and changed cells flash after a refresh so you can see what moved.
- A tip on every header — hover a column header for a short note on exactly what that number counts.
- Default layout — Deletion and Result start visible. Buyers and Earned are optional separate columns.
Result, Buyers, and Earned count PPV unlocks from this send only. Tips and any other purchases a fan makes in the chat are not included.
Customizable columns
You can show or hide table columns using the columns visibility button in the table header. Click the slider icon to open a dropdown where you can toggle individual columns on or off. Some columns (Campaign, Status, Actions) are always visible and cannot be hidden. Your column preferences are saved locally.Page size
You can change how many campaigns are displayed per page using the page size selector at the bottom of the table. Your selection is remembered locally.Campaign statuses and workflow
Creating a campaign never sends it. The safe workflow is Save → Draft → Review → Launch: save the draft, verify the audience count, message, price, removal timer, limits, and estimated duration, and only then launch it. For a multi-message campaign, also verify every Collection, the order of messages, and the delay between each follow-up. A regular campaign assigns one chain to each recipient. An Every time automation selects a chain on each eligible event using its saved In order or Randomly mode.Pause and resume
Use Pause campaign on a Pending or Sending campaign when you need a temporary stop. Pausing does not cancel or delete the campaign. New sends stop, while a message already being sent may still complete. The campaign changes to Paused, and Resume campaign returns it to its previous workflow. The confirmation keeps Pause scheduled messages enabled by default. Keep it enabled to hold delayed messages that already belong to this campaign; they are released for immediate sending when you resume. If you clear it, those already scheduled messages can still be delivered while new campaign sends are paused. A regular campaign loads its matching audience again when it resumes, so the recipient set can change. A trigger-based campaign does not replay fan events that occurred during the pause; after resume it reacts only to new events. See Automated Messages. If AgencyKey cannot confirm whether Pause or Resume succeeded, refresh the campaign list and check its current status before trying the action again.Audience load failures
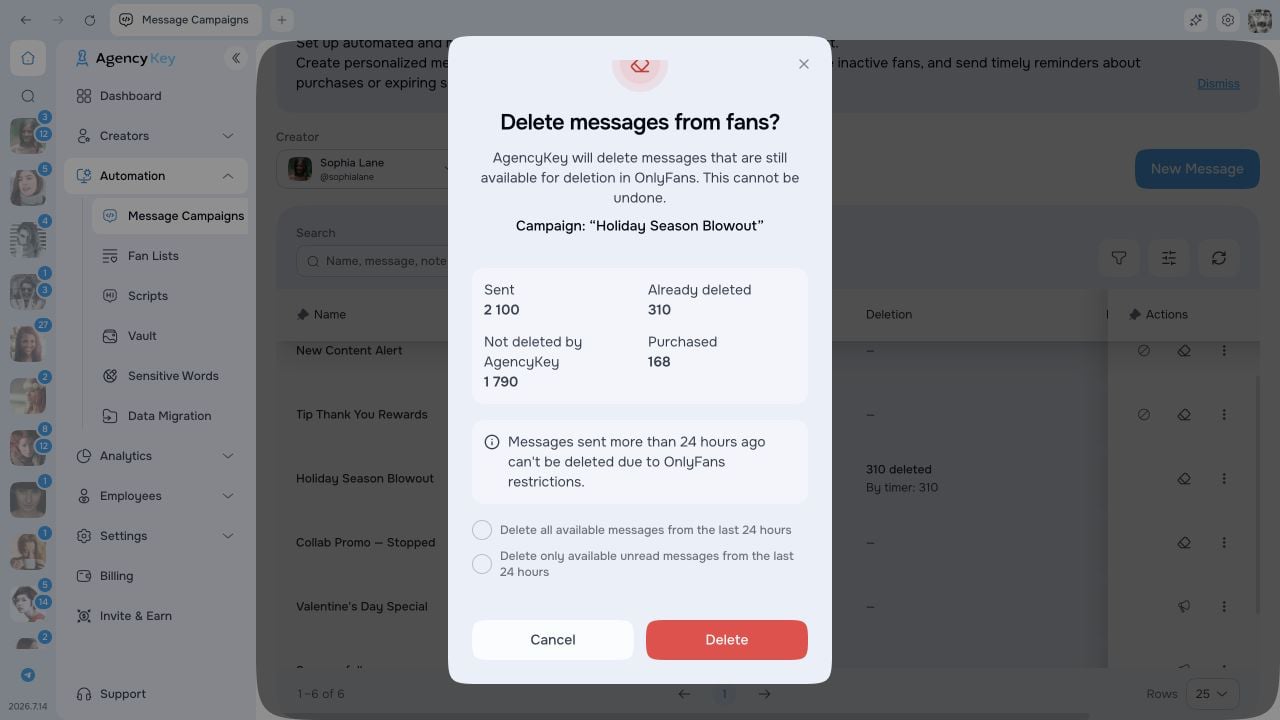
If a campaign finishes because its matching audience could not be loaded, the status reason is shown as Audience: Failed to load matching fans. Please try again. Hover the status in the Mass Messages table to read it; the same reason is available from the Mass Messages summary on Dashboard. Before creating a replacement, verify the selected creator connection and audience rules, refresh Mass Messages, and confirm that the audience loads again. If you retry the campaign, start from a reviewed draft or copy. This message explains the audience failure; it does not mean a send with zero confirmed recipients succeeded. Deletion has its own column and does not replace the delivery lifecycle above. While cleanup runs, that column shows Deleting; it ends as Finished or With errors and shows the deleted count. Open the deletion details to distinguish copies removed by timer from those removed on demand. The breakdown also shows copies that could not be removed because the PPV was purchased, the deletion window expired, the message was already absent, or a technical error occurred. For a manual run, the latest result separates deleted, already absent, expired, and failed copies.Filters
Use filters to quickly find specific campaigns:- Status — Filter by campaign status
- Search — Search campaign name, message text, and internal note
- Price range — Filter by message price
- Created date — Filter by creation date
- Created by — Filter by the team member who created the campaign
- Sending date — Filter by scheduled sending date
- Launched by — Filter by the team member who launched the campaign
- Cancelled date — Filter by cancellation date
- Cancelled by — Filter by the team member who cancelled the campaign
- Sent — Filter by number of sent messages (min/max range)
Actions
Available actions depend on the campaign status and your permissions:- Edit campaign — Edit a draft; a launched automation allows only its name and note to change
- Create a copy — Duplicate the campaign into a new draft
- Launch campaign — Review the saved draft, then start it now or at the configured time
- Pause campaign — Temporarily pause a Pending or Sending campaign
- Resume campaign — Continue a Paused campaign
- Stop sending — Permanently stop a Pending, Sending, or Paused campaign
- Delete sent messages from OnlyFans — Delete all eligible copies or eligible unread copies from the last 24 hours
- Stop deletion process — Stop an active deletion job; already deleted messages cannot be restored
- Delete draft / Remove campaign from CRM — Remove the CRM campaign record when available; this is separate from deleting delivered messages in OnlyFans
Limits and sending speed
The editor shows the current audience cap, allowed sending-rate range, Account default, and estimated duration for the selected model. These values can differ by creator, so always follow the limits shown in the campaign editor. A custom rate can be selected only when your role has the corresponding permission. The optional campaign count limit is Maximum recipients for regular and send-once campaigns, or Maximum chain starts for an Every time automation. Follow-up messages do not increase either count, and a chain already in progress continues after the limit or end time stops new chains. All priority campaigns for one Account share that Account’s current hourly sending limit. The rate on one campaign is not a separate pool reserved for that campaign. If AgencyKey cannot load the current limit, the Account’s current limit is used, custom-rate controls stay disabled, and the editor shows Retry. It does not replace an existing campaign’s saved custom choice merely because the current settings could not be loaded.Permissions
Viewing campaigns, creating or editing drafts, launching, pausing and resuming, stopping, deleting sent messages, deleting campaign records, and changing the sending rate are separate permissions. Buttons that your role cannot use are hidden or disabled; creator scope also limits which model accounts you can manage.Next steps: create → target → automate → review
- Create a campaign — Prepare the content and save it as a draft; saving does not send anything.
- Target the audience — Set the Include and Exclude rules, then verify the recipient count.
- Automate when needed — For trigger-based messages, choose the event, delay, frequency, and targeting before launch.
- Review the result — Follow status and delivery first, then use the performance columns to compare completed sends.